
Archive IMAP Email Offline with Apple Mail
A Complete Guide to Managing IMAP Email with Local ‘On My Mac’ Folders
Archiving Mail to Local Mailboxes
There are times when you might want to store your older emails locally on your Mac. One of these reasons could be that you have run out of storage space on your IMAP (Internet Message Access Protocol) Email provider’s server. Another could be that you simply want greater security by keeping encrypted offline backups of old email locally rather than on someone else’s server. This is useful for email since your messages are not end-to-end encrypted at rest due to the older less secure standards that email is based on. Even when enabling Apple’s Advanced Data Protection (ADP), email is still not as secure as other data stored in iCloud.
Whatever reason you may have to want to archive old email locally on your Mac, it is quite simple to achieve within Apple Mail. Let’s look at a simple and flexible workflow that you can use in Mail.app.
Archive IMAP Email to Local ‘On My Mac’ Folders
Creating Local Inbox and Sent Folders
The best way to set up Apple Mail to work efficiently is to create a folder for email in your IMAP Inbox and Sent folders respectively. The folders that you create will reside locally within the ‘On My Mac’ directory:
Create a local Inbox folder by selecting ‘New Mailbox…’ from the Mailbox menu or clicking the +(plus) button next to ‘On My Mac’ in the Mail Sidebar
Choose the ‘On My Mac’ option for the Location: popup

Create New ‘On My Mac’ Mailbox Window
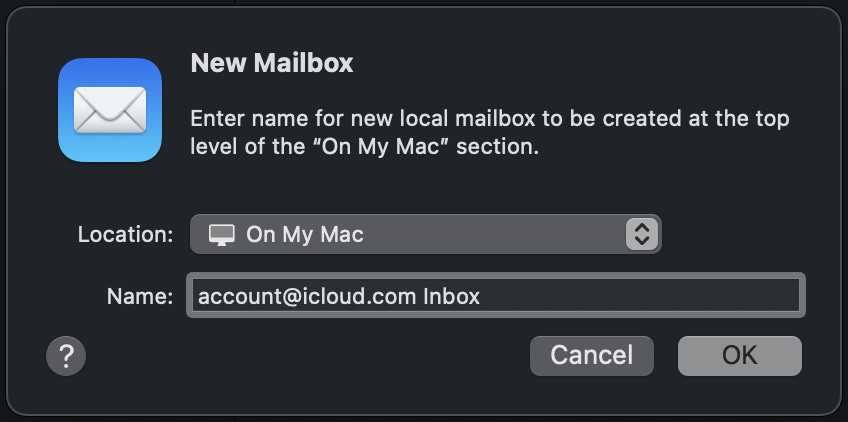
Under ‘Name:’ title your mailbox something like ‘Account Inbox’ where Account is replaced with the name of your email address
Repeat steps 1-3 to create an ‘Account Sent’ mailbox since email you send will be filed here for local storage
Adding Local Mailboxes to Favorites
Creating the appropriate local mailboxes is the first part of the process. Once you have created those and placed them in the desired ‘On My Mac’ location within Mail, we will look at setting them up as Favorites to quickly file mail away with a keyboard shortcut:
Right-click on the ‘Account Inbox’ folder listed under ‘On My Mac’ in the Mail Sidebar (⌃Control-⌘Command-S to Show/Hide Sidebar) and choose ‘Add to Favorites’ to add your local Inbox folder to the Favorites bar
Drag the Inbox folder button you just created in the Favorites bar to the far left side right next to ‘Mailboxes’
Right-click on the ‘Account Sent’ folder listed under ‘On My Mac’ and choose ‘Add to Favorites’ to add your local Sent folder to the Favorites bar
Drag the Sent folder button you created in the Favorites bar just next to the right side of the local Inbox folder at the far left of the Favorites bar
The steps that you just followed will now allow you to select a message in your IMAP Inbox or Sent folder and then press the shortcut: ⌃Control-⌘Command-1 (for Inbox email) or the same shortcut with a ‘2’ at the end (for Sent email) to instantly move your selected IMAP message(s) to the desired local ‘On My Mac’ folder. You can also drag and drop emails manually to the appropriate folder button on the Favorites bar or the intended ‘On My Mac’ folder in the Sidebar.
Importing Local Email to a New Mac in Apple Mail
Now that we have covered the workflow for quickly moving IMAP email to your local ‘Inbox’ and ‘Sent’ mail folders, it is important to know the best way to transfer this offline email to Apple Mail on a new Mac.
The following method is the best and cleanest way to import email from ‘On My Mac’ local mailboxes that I’ve found in my research and testing. I use this protocol when importing my iCloud email, which has been archived locally using the method outlined above, each time I move to a new Mac and it works perfectly.
Start by navigating to your current ~/Library/Mail folder directory (This folder is a complete local backup of your entire email database):
Copy this ‘Mail’ folder to an external drive
Connect the external drive to your new Mac
Open Mail.app on your new Mac:
Select File>Import Mailboxes in Mail.app on your new Mac
Click>Import data from: ‘Apple Mail’ as shown in the image below and click ‘Continue’

Navigate to the Mail folder (on the external drive) and open the folder inside called: V(x) where (x) is the latest version number of your mailboxes folder based on the version of Mail.app that created it (mine reads V10)
Click ‘Choose’ from the dialog window
Select each Inbox and Sent ‘On My Mac’ mailbox you want to import by clicking the checkmark next to that mailbox
Click ‘Continue’
Upon completion of import process, click ‘Done’
Rename or rearrange the position of the imported local ‘On My Mac’ mailbox folders in the Mail.app Sidebar to your liking
You should now have a clean import of the local email in Mail.app from your previous Mac transferred over to your new Mac!
The Complete Workflow
After you have mastered the concepts presented in this guide, you will be able to effectively manage your archived email locally on the Mac. Everything that you archive locally to ‘On My Mac’ folders is also accessible with the Mail search bar just like every other email message in your IMAP account. Time Machine or Carbon Copy Cloner backups also ensure that your local Mail archive is fully backed up to an external drive that can be easily restored by following the email import protocol detailed above.
I hope you have found great value in this complete guide to managing your email locally on the Mac. Thanks for reading and please consider becoming a member of Apple Dispatch to support the publication and become a part of an outstanding community.
Helpful References:
Import or export mailboxes in Mail on Mac
https://support.apple.com/guide/mail/import-or-export-mailboxes-mlhlp1030/mac
iCloud data security overview - Apple Support
https://support.apple.com/en-us/102651