
Enhance macOS Capabilities with TinkerTool
App Spotlight: TinkerTool, an Application to Enable Hidden Settings in macOS

The macOS Experience
macOS offers a great degree of customization to individualize your Finder Desktop experience and make significant quality of life improvements. Many of these customizations be accessed through System Settings, but there are many other hidden options that can only be configured through the Terminal. You could try to look up some of these commands on the web, but there is an even better tool that provides a graphical user interface (GUI) to easily access and control these options on every Mac you own. This application is called, TinkerTool.

Getting Started with TinkerTool
This incredibly useful utility is free to use and download directly from the developer’s website. Once you have downloaded TinkerTool by clicking the ‘Download’ button from the web page, you can double-click the .dmg file in your ‘Downloads’ folder. Should you require an older version of TinkerTool if running a non-current version of macOS, there is a special download page you can access. Now press ‘Agree’ to the User License Agreement which will open the TinkerTool virtual disk. Drag the app's icon to your ‘Applications’ folder. Click the virtual disk and press ⌘Command-E or Right-click and choose Eject to remove the installer disk from the Desktop. You can also delete the TinkerTool.dmg file at this point if you’d like. Double-click the newly installed TinkerTool app or launch it from Spotlight and click ‘Open’ if you see a dialog window asking if you are sure you want to open it:

After opening TinkerTool for the first time, make sure that you click on ‘TinkerTool’ from the menu bar and enable ‘Automatic Update Checks’.
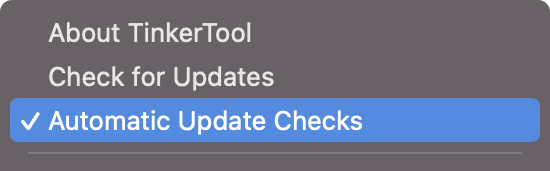
TinkerTool does not update automatically in-app, but it will let you know with a dialog window that includes a download link when a new version is available from the developer’s website.
Interface Enhancements
Improving Dock Interactions
The Dock is something that is quite specific to your individual preferences and while you can control various aspects of its position on your display and whether it automatically hides from within System Settings, there are a few options only to be found within Terminal or TinkerTool that I find quite useful. In TinkerTool's ‘Dock’ tab, there are three options that I recommend enabling or at least trying out to see if they improve your interactions with the Dock.
These settings are found just under ‘Dock Options’:

Use dimmed icons for hidden applications
This option gives a nice visual indication when you’ve hidden an open application.
Disable animation when hiding or showing Dock
This option speeds up appearance of the Dock when dragging the arrow pointer to reveal the Dock. This options and the next one are only relevant when ‘Automatically hide and show the Dock’ is enabled in System Settings > Desktop & Dock.
Disable delay when showing hidden Dock
This option works in combination with the previous one to ensure the Dock appears instantly when dragging the arrow pointer to reveal the Dock.
You need to click the ‘Relaunch Dock’ button from the bottom of TinkerTool’s ‘Dock’ tab in order for these changes to take effect:

Expand Save Dialogs
One thing I always find annoying when working with the Save dialog window in apps is how they tend to default to use the compact window display. I want this expanded to full dialog display whenever possible. Happily, TinkerTool has a setting in the ‘General’ tab under ‘Sheet’ where you can enable ‘Prefer expanded Save dialogs when using new applications’:
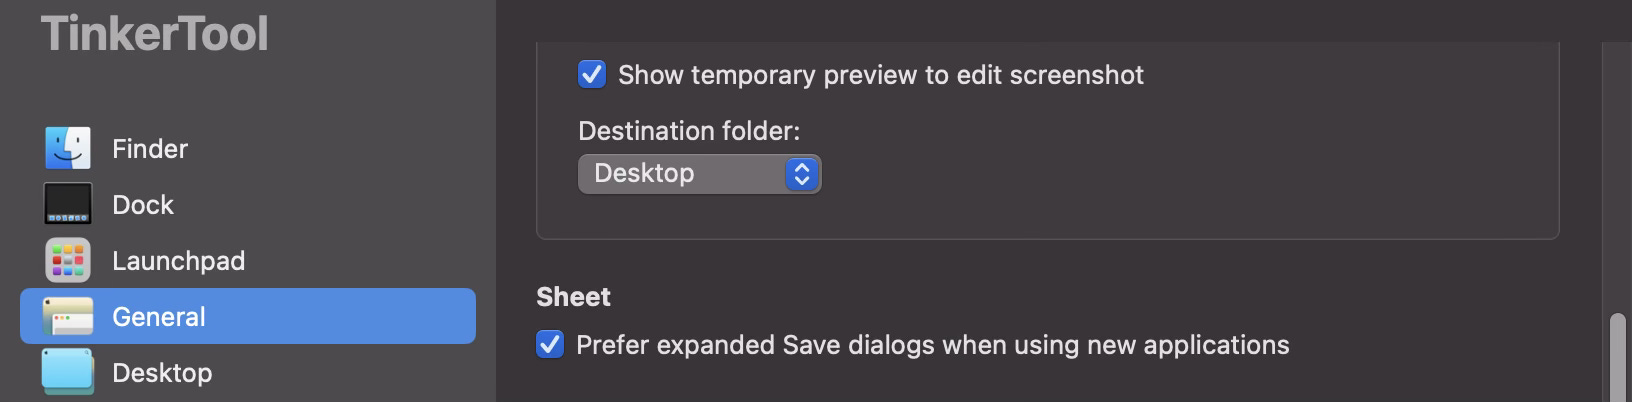
This option can save you some additional clicking to expand the Save dialog window by default in the future.
Show File Path in Finder Windows
When navigating deep inside directories within a Finder window it is nice to have additional information displaying the full file path. This is exactly what TinkerTool allows you to enable in its ‘Finder’ tab by enabling ‘Show selected path in window title’:
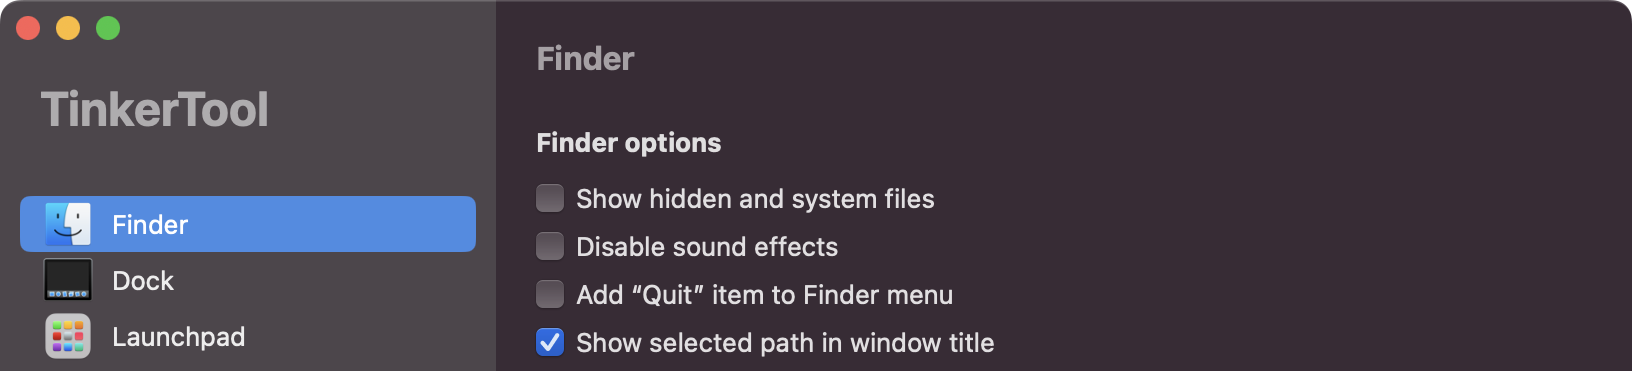
Once you enable this option, you will see the full path listed in the title of your Finder window instead of just the folder name. It’s quite useful!
Screenshot Options
Remove Window Screenshot Shadow
When screen capturing windows with the ⇧Shift-⌘Command-4 shortcut (> move crossbar over window > press Space bar > click), I prefer to remove the drop shadow from the resulting image. You can do this manually each time by adding the ⌥Option key with the click to save to Desktop. However, I would rather this be the default behavior. Once again, TinkerTool has this covered in the ‘General’ tab. To disable shadows in screenshots turn off ‘Include shadow when capturing window (⇧⌘4)’:

Now, every time you take a screenshot of a window, a shadow will not be included.
Screenshot Destination Folder
Within this same area of the ‘General’ tab are many other useful options. One of these is the ability to change the ‘Destination folder’ where macOS saves your captured image and video Screenshots. To change this simply click the popup under ‘Destination folder:’ and choose ‘Custom folder:’ to ‘Select’ the one you want in the navigation dialog.
Bonus Tip
It is worth noting that you can also choose a custom destination for image and video captures from the built-in Screenshot tool by invoking it with ⇧Shift-⌘Command-5:

Select ‘Options’ from the tools panel and choose ‘Other Location…’ where you can navigate to the intended folder. You also select the option to ‘Save to’ Mail or Messages, which is great for quickly sending image captures or videos directly to your intended recipient.
Note: Changing the destination folder here will also be recognized by TinkerTool.
Screenshot Image Format
Another useful option you can change is the Screenshot file format for images. There are options to create ‘JPEG’, ‘PDF’ or ‘TIFF’ files. To change the file format, select the ‘Operating system default’ popup under ‘Screenshot file format:’ from the ‘General’ tab and choose the format you want. If, for instance, you prefer JPEG to the default PNG, just select ‘JPEG-JFIF’:

This setting will be retained so that each time you create an image capture with Screenshot, your selected file format will be used.
Eliminating Annoyances
Crash Alerts
One thing that I find quite annoying when working on my Mac is when an application unexpectedly quits, a dialog window demands your attention on screen and you have to click either to ignore the alert or to send a report with the crash data. I don’t want to click either of these options. In fact, I’d rather not see a notification of any kind. TinkerTool comes to the rescue for just this scenario. In the ‘Desktop’ tab, under ‘When applications crash, there is an option for ‘Don’t display anything’ and this is my preferred choice, as I don’t want to be interrupted while getting work done:

You can also choose to ‘Use Notification Center’ to display the crash alert based on your System Settings for ‘Notifications’ along with several other options.
Wrangling Time Machine
One of the nicest options that TinkerTool provides is the ability to force Time Machine to ignore new drives when connecting them to your Mac. You may be plugging in a drive that isn’t a backup drive or you might use a different app to backup your Mac like Carbon Copy Cloner. Either way, this setting will eliminate Time Machine pestering you about using the drive you just connected as a backup disk. This setting resides in the ‘Applications’ tab and is titled, ‘Don’t ask for backup disks when connecting new drives’:

Enable this feature and this annoyance will be no more.
Final Ideas
Restore Your macOS Settings
It is important to keep in mind that if you accidentally change a macOS system behavior with TinkerTool and can’t find the setting that was changed, you can always reset everything back to the way things were before you started tinkering. Simply go to the ‘Reset’ tab and click ‘Reset to pre-TinkerTool state’:
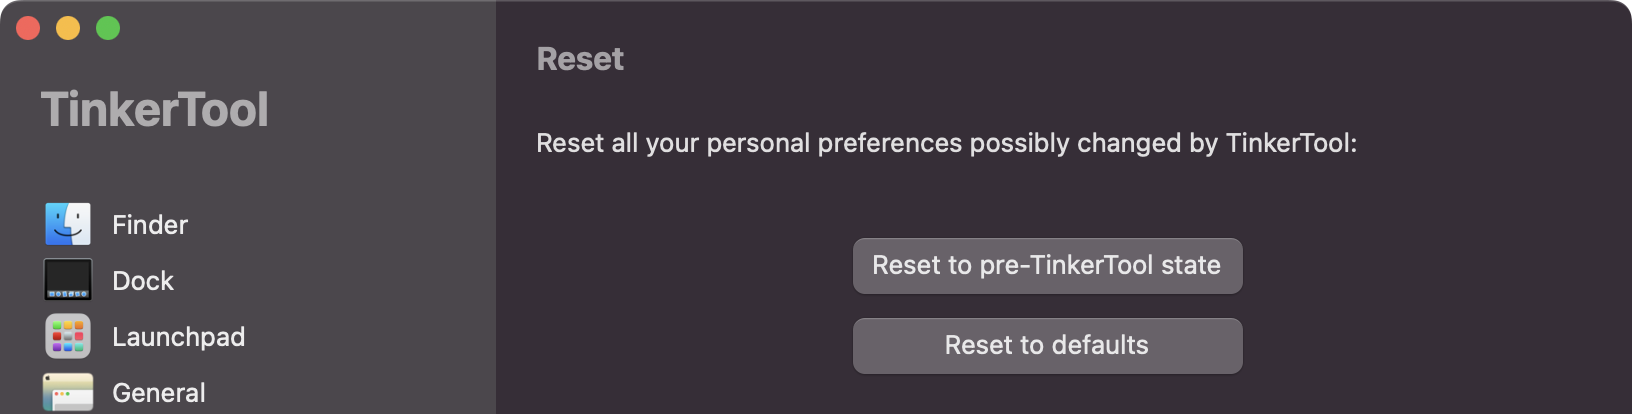
Then log out of your user account and when you log back in, your macOS settings will be the “normal” ones that were configured directly in System Settings.
More Options to Explore
I encourage you to play around with some of these customizations to see which ones improve your experience on the Mac. Also, take a look at some of the additional tabs within TinkerTool and you just might discover a way to eliminate a friction point with how the System works by default. I hope you enjoyed reading about ways to enable your Mac to work the way you want with TinkerTool!