
Defeating Web Fingerprinting and Tracking with a VPN
The Web Fingerprinting Series (Dispatch No. 3)
Setting the Stage
In this web privacy series focusing on strategies to defeat fingerprinting and tracking, we have already covered deploying the Chameleon web browser extension as one effective tool to accomplish this aim in Dispatch No. 1:

For Dispatch No. 2, we explored setting up the Firefox web browser to secure our browsing activity through optimal privacy configuration:

If you haven’t yet followed the discussion in these previous guides, make sure you check them out to have a full picture of how the complete protocol in this series works.
In this third and concluding part of the series, we will look at how to properly deploy a VPN to complete the foundational approach for defeating web fingerprinting and tracking.
The Importance of a VPN
Any discussion of a VPN or Virtual Private Network must start with how the open Internet itself operates. When you connect your computer or mobile device to a Router through Wi-Fi or Ethernet, you are assigned a unique IP (Internet Protocol) address. This address is specific to your device and is one major point of weakness for those looking to track your movements online. It reveals your physical geographic location that is also tied to your virtual one. This is a powerful factor that can be used to track and fingerprint you all across the web.
When you use a VPN, however, you are assigned an IP address by one of their servers that is shared by many other users. Hence, security through obscurity. This shared address is the one identifying your web requests as you exit the private VPN network and venture out onto the public Internet. Your unique personal IP address, assigned by your ISP, is only known to the VPN provider and is no longer traceable by other actors on the web.
The next factor that is connected to your IP address is the DNS (Domain Name System) lookup request that occurs when you initiate a web search or enter a Web URL into your browser’s navigation bar. Your DNS lookup reveals your IP address to the DNS server that you are using and this can also be collected by the destination address that you are navigating to. Since the public DNS provider like your ISP or another public provider collects each of your DNS lookup requests, they can log each website you visit. This is often referred to as a DNS leak. By using a VPN, your DNS requests are sent over their DNS servers and encrypted within the VPN tunnel. An ISP or third-party DNS provider also can censor your lookup requests depending upon what part of the world you reside in. This can also be deftly circumvented by using private DNS servers over a trustworthy VPN.
As you can see, both your IP address and DNS lookups can effectively be protected from tracking and fingerprinting through the use of a reputable VPN. Even though there are many different options, the provider that I use and recommend after much research and experience is Mullvad VPN. They also have an unrivaled reputation in the security community for being a trustworthy provider to help protect your privacy on the web.
One great thing about Mullvad is that they allow for anonymous account creation since they don’t require a name or email address to sign up. They just generate a random account number that you will use to enter into the Mullvad app from each of your devices (up to 5 per account). And it is very easy to purchase service credits for 6 or 12 months from Amazon (on a card with obfuscated credit numbers) that you can easily add to your randomly generated account number. They also accept a number of crypto currencies and even cash payments over snail mail for the greatest anonymity. Just remember to store your account number in multiple locations, for instance Bitwarden (or other secure password manager) and a secure physical copy that you don’t share with anyone. You can always create a new account if you somehow lose access, but you will forgo any prepaid amount still available on your lost account.
Let’s take a look at how to get started with Mullvad VPN.
Downloading and Installing Mullvad
A great first step is to download the Tor web browser if you are currently running your computer over an open Internet connection. This is another privacy technology that can secure your web traffic especially when you don’t already have a VPN installed and activated. You can find it at the official Tor project download page.
Once you have opened the disk image for Tor and dropped the application in your Mac’s Application folder, you are ready to use this browser to create your Mullvad VPN account and download the necessary software. Mullvad even operates their own onion address, which can be utilized within the Tor browser for even greater connection security while creating your VPN account. So, let’s get started:
Open the Tor browser and enter Mullvad’s onion address: o54hon2e2vj6c7m3aqqu6uyece65by3vgoxxhlqlsvkmacw6a7m7kiad.onion
Navigate to the Mullvad account creation page
Click ‘Generate account number’
‘Copy’ the fresh account number to your clipboard and paste into a new account entry in your password manager and save
Write down the number in a secured physical notebook
Click ‘Download’ from the same page under step ‘3. Download the app’
Choose macOS, or other OS, from the options presented and click ‘Download’ (Mullvad for iOS can be downloaded directly on-device from the App Store)
Once the Mullvad download completes, Quit the Tor browser as it is not recommended to run a VPN and Tor simultaneously
Open the downloaded file and follow the on-screen instructions to install Mullvad (For any macOS installation issues follow Mullvad’s troubleshooting)
Open the Mullvad VPN application
Enter your account number within the Mullvad interface in your menu bar (This information is accessed in the ‘Account’ area accessed by clicking the user icon)
Enter the credits (if purchased from Amazon) from the number on the Mullvad pre-paid card (or directly if purchased from Mullvad with an alternate method) in the ‘Account’ area by clicking ‘Redeem voucher’
Next, you will want to choose the server location(s) to create a secure VPN connection. Let’s look at that consideration now.
Choosing the Right Server Locations
Another important consideration when choosing which VPN servers to connect to is the question of ownership. This applies to whatever VPN service you happen to be using. In the case of Mullvad, there are servers they own directly and those that are rented from third parties. Since all of your traffic is being tunneled through the VPN servers at the other end of your connection, it is important that you can trust who you are sharing that data with. Keeping this in mind, Mullvad gives you the option from within their interface to filter the server locations by Owned. These are servers that Mullvad maintains control over and can physically access. You can also choose servers from this list in countries who are known for better privacy policies like Switzerland, for instance.
Click the ‘Country name’ or ‘Switch location’ button from the main Mullvad screen:

Next click the ‘Filter’ button in the upper right corner:

Select ‘Mullvad owned only’ to present those servers in the main interface:

Click ‘Switch location’ again to choose the ‘Entry’ server location:
Click ‘Exit’ to select the ‘Exit’ server location:
Note: If you need to connect to a USA based server, you will have to choose ‘Any’ for ‘Ownership’ as Mullvad does not own any servers within the USA. You can also dismiss the ‘Owned’ filter by clicking the ‘X’ next to it above the VPN locations.
Now you are all set with the basic configuration of your secured VPN connection! Let’s take a look at some more advanced settings.
Configuring Your VPN Optimally
There are some important considerations when setting up your VPN. Even though we are using Mullvad for this guide for the reasons previously discussed, many of the these options will translate to another VPN you may happen to be using.
Mullvad’s settings are accessed by clicking the menu bar icon, which looks like a lock. You then click the gear icon at the top-right corner of the interface. Now we can look at the first important option to enable.
Multihop
The Multihop option is a great additional layer of security as you browse the web. It provides for one VPN server from any available location that you enter and another from the location that you exit before going out onto the public web. This makes it even more difficult to track your traffic across the web. The only downside is that this will increase latency and slow down your upload and download speeds to varying degrees. The additional security gained is usually worth the tradeoff, however. Let’s look at how to set this up:
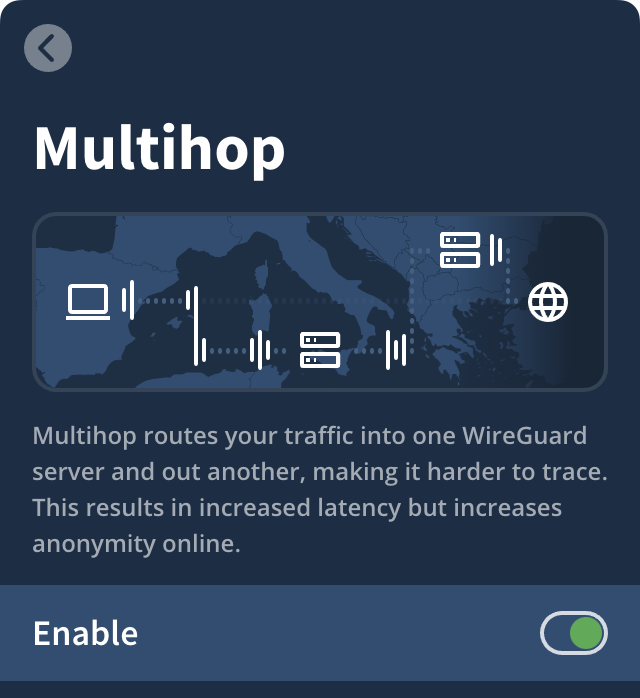
Click on the Mullvad icon in the menu bar and then the gear icon for settings
Next click Multihop and turn the Enable switch to the on position
It is good to keep in mind that in addition to the ability to select servers from entirely different locations, you can also select both VPN servers from the same location when in Multihop mode. This will assign a secure shared IP address from the ‘Entry’ node server and a different shared IP address from the ‘Exit’ node.
Bonus Tip:
You can disable this setting if you are not getting good download speeds for a particularly intensive web task. I have found that this typically can be corrected by changing one or both of the two VPN server locations, however. Turning off Multihop may also be advisable when you have a weak cellular connection on your iPhone and are having difficulty maintaining a VPN connection.
VPN Settings
The next part of Mullvad’s settings is the ‘VPN settings’ panel which you can activate by clicking. You should enable ‘Launch app on start-up’ and ‘Auto-connect’ which ensures that Mullvad will both open automatically when starting up your Mac and immediately connect to the VPN:

Local Network Sharing
Local network sharing is a critical option if you use an AirPrint printer on your 2.4 GHZ Wi-Fi network. You will otherwise not be able to print with this setting disabled. You should also be aware of the need to enable this setting if you need to access other devices on your local network:

DNS Content Blockers
In the ‘DNS content blockers’ settings, you have many options to filter out unwanted web assets from ever loading through Mullvad’s private DNS servers. You can eliminate things like Ads, Trackers and Malware. It is recommend to enable at least these three in order to protect against fingerprinting and tracking. There are other options to enable or disable according to your specific use case.
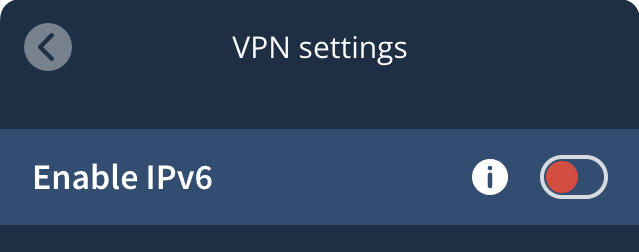
The Enable IPv6 Setting (Hint Don’t)
It is actually recommended both for security and robustness to disable this setting as you will get both a more stable connection and eliminate the possibility of leaking your IPv6 address assigned by your ISP by implementing the older but more secure IPv4 technology.
Your Mullvad app ‘VPN settings’ interface should look like this:
Another setting related to this is found under WireGuard settings which will be discussed below.
The Kill Switch
The ‘Kill switch’ is always enabled while running Mullvad and will block outgoing device connection attempts when the Mullvad application is open to prevent your traffic from leaking outside the VPN tunnel if your VPN connection should be disrupted for any reason.
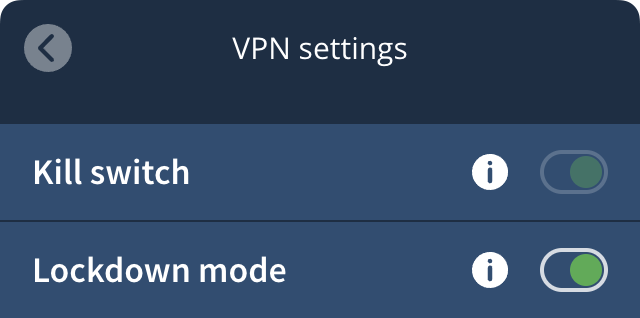
Lockdown Mode
The ‘Lockdown mode’ should be enabled for additional security when employing a VPN to always protect your outgoing connections. With this mode enabled, you are requiring a VPN connection in order for your computer to reach the Internet. This will be enforced even if you manually Quit Mullvad.
Note: If you need to connect to the Internet without a VPN enabled, you will have to disable ‘Lockdown mode’ and Quit the Mullvad application by clicking the gear icon in the upper-right of the interface and choosing ‘Disconnect & quit’ at the bottom.
WireGuard Settings
Unless you have a reason to want to run the older OpenVPN protocol, you should be running the newer and more efficient WireGuard, which also gives you access to Multihop and the important security future-proofing option: Quantum-Resistant tunnel. Once you enable the WireGuard protocol by choosing it from the options presented, you will have access to the ‘WireGuard settings’ button near the bottom of the ‘VPN settings’ screen.
Obfuscation
Obfuscation is an anti-censorship option that can be used to enable a VPN connection where it might otherwise be detected and disabled by a nation-state. If you live in a country that doesn’t censor the open web and VPN technologies then you should disable this setting by choosing, Obfuscation→Off. This will also keep your VPN connection running faster as turning this setting on will increase latency. If you need to circumvent censorship in your region, you can enable ‘Shadowsocks’ by choosing it from the Obfuscation options.
Quantum-Resistant Tunneling
When running the recommended WireGuard protocol, you should choose to enable Quantum-resistant tunneling to protect your traffic against future quantum capable mainframes that might try to decrypt your currently captured data packets. Scroll down to the middle of the ‘WireGuard settings’ screen to find this option and enable it by selecting ‘On’:

While there is some additional data exchanged with the server upon a new connection being established, the additional security future-proofing is well worth it.
IP Version
Within the IP version section, you have the ability to choose Automatic, IPv4 or IPv6 as the desired protocol. As mentioned earlier in this guide, unless you have a device that requires IPv6, you should choose the more robust and secure ‘IPv4’ protocol:

Web Browser Considerations
DNS over HTTPS
As we discussed earlier, it is important to remember that DNS requests need to be protected in tandem with your IP address. If you are using a web browser like Firefox that supports DNS over HTTPS, make sure that you turn this feature OFF as mentioned in the previous guide in this series. The reason this is the case is that Mullvad provides their own private non-logging DNS servers that you have access to when connected to their VPN. And by making sure that you are using your VPN provider’s DNS servers, you are protecting your DNS queries from leaking information about you all over the web.
WebRTC
In the previous part of this series we also mentioned a bonus tip for disabling WebRTC for eliminating DNS leaking. Be sure to review that setting in Firefox if you haven’t yet done so by following the direct link above.
A good way to verify you are not leaking your DNS is by using Mullvad’s Connection check. If you pass this test then your DNS is safe and secure!
Putting It All Together
After you have carefully considered the concepts and steps in this three-part series in defeating persistent fingerprinting, you should have a solid grasp and practical setup to greatly enhance your own privacy and security across the web. By carefully reading these guides you will gain tremendous value and real-world knowledge that you can now implement on your own system.
And when you have integrated all the steps from each guide in the series, you can even check your own system against fingerprint.com by following the instructions on how to run this test at the end of Dispatch No. 1. See if you can now elude these persistent fingerprinting methods.
Thank you for reading part three of this series for defeating web fingerprinting on Apple Dispatch! Please consider becoming a Premium Member, so that you don’t miss out on all the valuable ideas to come like our recently published guide:

See you next time!
Helpful References:
Defeating Persistent Web Fingerprinting with Chameleon
https://appledispatch.substack.com/p/defeating-web-fingerprinting-with-chameleon
Defeating Web Fingerprinting and Tracking with Firefox
https://appledispatch.substack.com/p/defeating-web-fingerprinting-with-firefox
privacy & freedom online (Tor Browser)
https://www.torproject.org/download/
A new, appeeling Tor onion address
https://mullvad.net/en/blog/new-appeeling-tor-onion-address
get started with mullvad
https://mullvad.net/en/account/create
mullvad vpn for macos
https://mullvad.net/en/download/vpn/macos
Using the Mullvad VPN app
https://mullvad.net/en/help/using-mullvad-vpn-app#vpnsettings
All about DNS servers and privacy
https://mullvad.net/en/help/all-about-dns-servers-and-privacy
How to prevent DNS leaks
https://mullvad.net/en/help/dns-leaks
connection check
https://mullvad.net/en/check
Mullvad adopts the TOR browser's strategy of trying to get everyone who uses it to leave the same browser fingerprint. The philosophy behind this could be labelled "Hiding in the Herd" to avoid standing out from the crowd. If TOR or Mullvad were as widely adopted as the Big 3 (Chrome, Edge, Safari) this might just work as intended. However, results from the Electronic Freedom Foundation's browser fingerprint test site "Cover Your Tracks" suggests that current tracking technology s up to the task of tagging a particular Mullvad/TOR browser on a specific device as unique and therefore trackable across the Internet. The results are superior to Firefox running the Chameleon extension (described in an earlier Apple Dispatch), but still inadequate to the task.
The only browser that evaded being tagged as unique, effectively making it untraceable, was the Brave browser. The Cover Your Tracks testing site consistently ranks Brave as "randomised". By making small changes to what it reports to websites, Brave renders it very difficult or perhaps impossible to track the browser between websites. Even returning to a previously visited website after only a brief interval does not offer enough consistent data to construct a locally persistent fingerprint.
Based on these results, I've opted to use Brave with a reliable paid non-USA based VPN service as my primary Internet interface. When a website fails to function properly or at all using Brave, and I decide the website does not present a serious risk to my device's functioning, I fall back to Mullvad using the same paid VPN service. Given Mullvad VPN's long-standing no-contract price of USD $5/mo, I leave myself the option to use it if any concerns arise about my main VPN service.
What do you think about all this, Apple Dispatch?